Role Management allows you to define and control access permissions for different users on your platform. You can create roles such as Admin, Editor, Moderator, or Content Creator, and assign specific capabilities to each role, like managing content, accessing reports, or controlling settings.
This feature ensures:
- Secure access control by limiting user permissions.
- Efficient workflow management is achieved by clearly defining responsibilities.
- Scalability, as more team members or departments can be added with custom access.
It helps maintain structure, security, and accountability across your platform’s backend.

To access this module, navigate to the sidebar menu and find the “Role Management” section.
Add Role
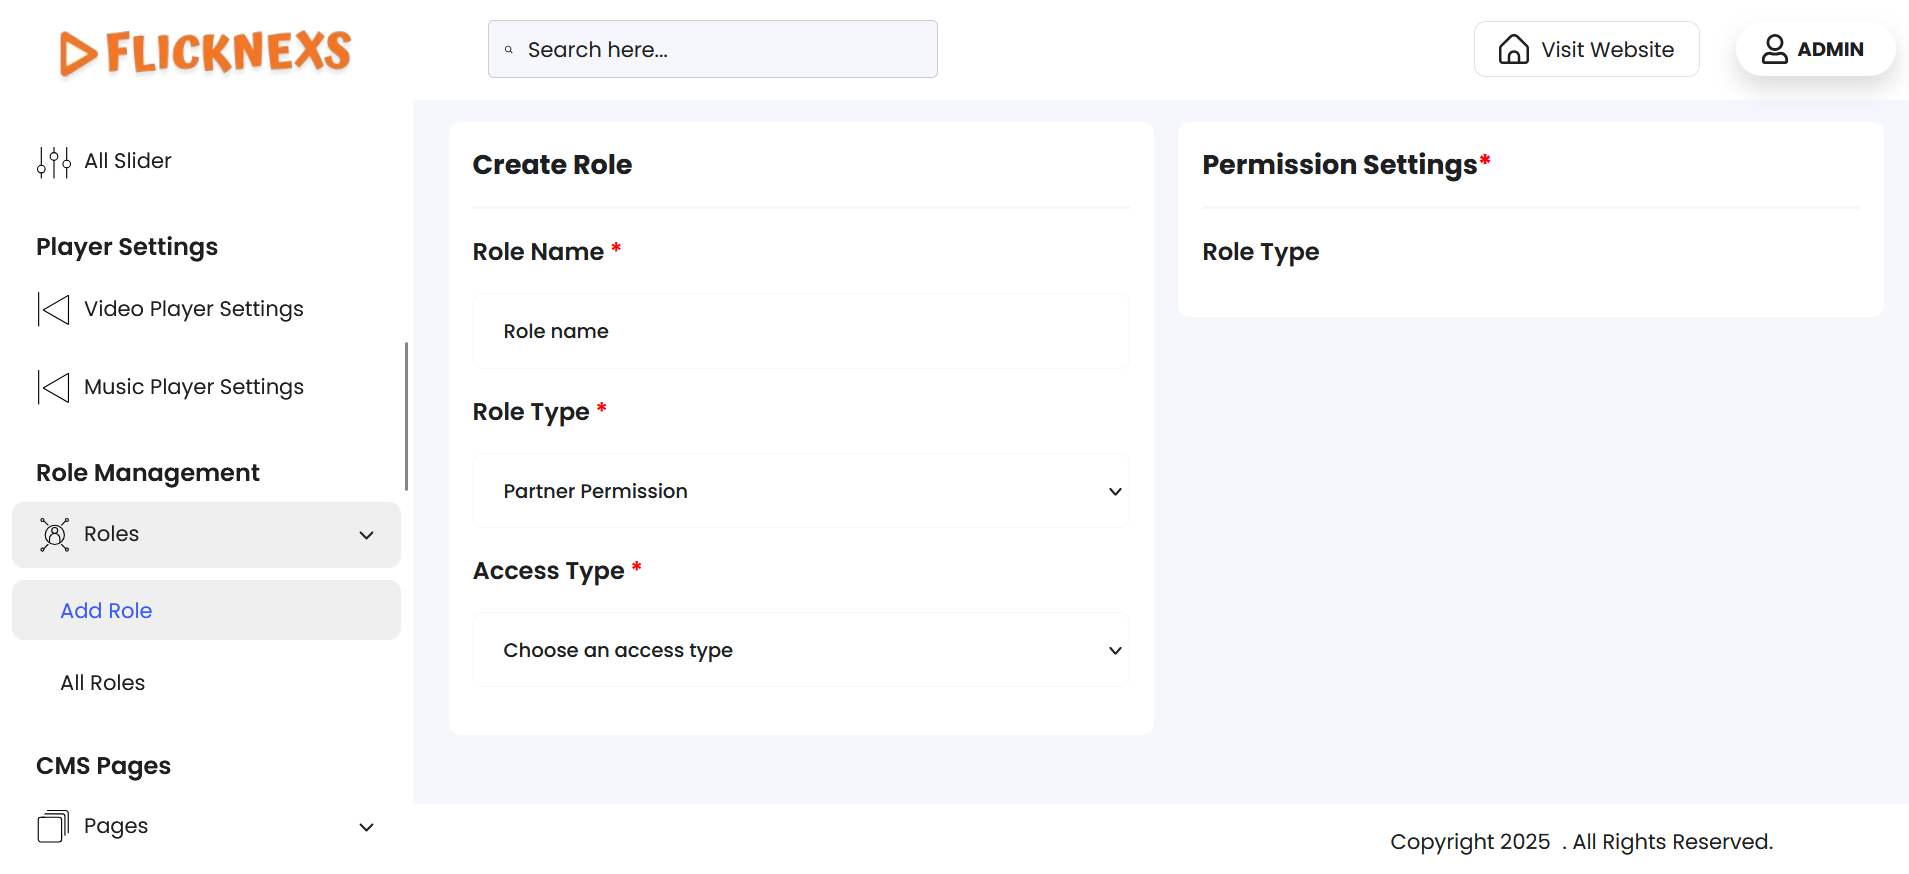
- Role Name: Enter the name of the role you want to create.
NOTE: If you omit entering, an error message ‘Role name cannot be empty’ will appear as this is a mandatory field.
- Role Type: Specifies the type of role permission to be assigned. This dropdown provides the following options:
- Partner Permission: Grants access to platform features intended for distribution or business partners.
- User Permission: Provides access limited to end-user or viewer functionality.
NOTE: If you omit selecting, an error message ‘Role type cannot be empty’ will appear as this is a mandatory field.
- Access Type: Defines the level of platform access granted to the selected role. This dropdown provides the following options:
- All Access: Grants full control and unrestricted access across all available features and sections.
- Read Only: Allows viewing access without permission to add, edit, or delete any data or content.
- Custom: Enables selective access based on specific permissions configured under ‘Permission Settings’.
NOTE: If you omit selecting, an error message ‘Access type cannot be empty’ will appear as this is a mandatory field.
Permission Settings:
Navigate to the right-hand side of the screen and find the permission settings matrix table. This panel allows you to assign granular access rights for the selected role based on individual platform modules. The menu lists key areas of platform control, and for each item, you can configure specific permissions using the following four checkboxes:
- Read: Grants view-only access to the selected menu item.
- Add: Allows the role to create new entries within the module.
- Update: Enables editing or updating existing records in the selected module.
- Delete: Permits deletion of entries from the module.
Tick the required boxes based on the intended responsibility and access control for this user role.
NOTE: At least one permission (Read, Add, Update, or Delete) must be selected for the system to recognize the configuration as valid. If no checkbox is selected for any module, the role will not be granted access to that section.
The following menu categories are listed when Role Type: Partner Permission and Access Type: Custom are selected. This combination displays the permission customization matrix explained below:
- Video Management: Controls user access to upload, edit, or delete videos available in the platform library.
- Series and Episode Management: Controls access to creating, modifying, or viewing episodic content such as series.
- Live Stream Management: Determines if the user can manage live-streaming sessions and related configurations.
- Audio Management: Sets access permissions for managing audio files, audio libraries, and relevant uploads.
- Artist Management: Regulates visibility and modification rights for cast and crew information, such as actor or artist profiles.
- Library Management: Defines access rights to the master content library, which stores all uploaded and approved content.
- Video Category Management: Allows control over organizing videos under various categories, genres, or groupings.
- Video Playlist Management: Enables the user to create or edit playlists of video content for different audiences or sections.
- Livestream Category Management: Manages categorization and structural organization of live stream content.
- Audio Category Management: Grants access to categorize and manage audio content by genre, theme, or mood.
- Audio Album Management: Controls permission to create and maintain collections of audio content grouped into albums.
The following menu categories are listed when Role Type: User Permission and Access Type: All Access are selected. This combination displays the permission customization matrix explained below:
- Dashboard: Grants access to the main user dashboard that displays user-specific statistics, updates, and performance overviews.
- Master Video List: Allows access to view and manage a consolidated list of all videos available on the platform.
- Video Management: Controls user access to upload, edit, or delete videos available in the platform library.
- Series and Episode Management: Provides access to create, modify, or view episodic content such as web series and structured shows.
- Live Stream Management: Determines if the user can create, schedule, or manage live-streaming sessions and related configurations.
- Audio Management: Sets permissions to upload, manage, and organize audio files in the system.
- Artist Management: Controls visibility and modification rights for cast and crew details, including actor, director, and artist profiles.
- User Management: Allows control over user accounts, profiles, access levels, and their overall interaction with the platform.
- Language Management: Enables access to manage multilingual content and translate platform labels or text for localization.
- Ads Slider Management: Grants control to create, modify, or manage image sliders used for displaying advertisements or promotional banners.
- Player Management: Allows the user to configure and manage settings related to the video player UI/UX.
- Partner Management: Grants access to manage partner accounts, performance, and data contributions (if partner features are enabled).
- Page Management: Allows the user to edit or create CMS pages such as About, Terms, Privacy Policy, etc.
- Plans Management: Provides access to create, edit, and organize subscription or monetization plans available to end users.
- Payment Management: Grants permission to view and configure payment-related settings and transaction data.
- Analytics Management: Allows access to platform statistics and performance metrics such as view counts, revenues, or user behavior data.
- Settings Management: Controls access to global system settings, preferences, toggles, and backend configurations.
- Ads Management: Allows users to set up and manage ad campaigns, slots, and monetization tracking.
- Contact Management: Provides access to manage support tickets, contact form entries, and customer queries.
- Logs Management: Grants visibility to audit logs, user activity, system errors, and administrative history.
- Menu Management: Allows the configuration of navigation menus shown in the frontend and user interface.
- Storefront Settings Management: Enables access to customize the look and behavior of the main storefront.
- Homepage Management: Controls homepage content layout, banners, blocks, and featured listings.
- App Settings Management: Manages mobile app-specific settings and configurations, if applicable.
- Meta Settings Management: Grants access to configure SEO tags, meta descriptions, and other optimization parameters.
- Roles Management: Allows managing roles and permissions for other users within the system.
- Library Management: Defines access to the complete content library that houses all videos, audios, and metadata files.
- Registration Management: Controls settings related to user sign-up flows, email verification, and login access.
- Playout Management: Enables control over scheduled video playouts, ideal for 24/7 streaming or curated viewing experiences.
- Video Category Management: Allows control over organizing videos under various categories, genres, or grouping structures.
- Video Playlist Management: Enables the creation and management of playlists to showcase grouped video content.
- Livestream Category Management: Facilitates the organization of live-stream content into relevant categories for user navigation.
- Audio Category Management: Grants permission to organize audio content into structured categories such as genre, artist, or type.
- Audio Album Management: Allows the creation and grouping of audio tracks into albums for better curation and user experience.
- Import/Export Management: Grants permission to import data into or export content from the platform for backup or external processing.
- Super Admin Settings: Reserved for users who require access to highly sensitive or root-level controls.
The same Settings Panel in Role Type – User Permission and Access Type – All Access combination appears in Role Type – User Permission and Access Type – Read Only combination as well.
NOTE: If no module is toggled ON, the role will have no effect, and the user will not be able to access any feature in the platform.
The same Settings Panel in Role Type – User Permission and Access Type – Read Only combination appears in Role Type – User Permission and Access Type – Custom combination as well. The only distinction is within the Matrix Table, where each module is presented with a checklist of actions instead of simple toggle buttons.
Once all the necessary toggle controls are configured and the action checklists within the matrix table are selected as per specifications, click on ‘Add Role’ to save the configuration. A toast notification, ‘Created New Permission Role Successfully,’ will appear to confirm the configuration. If you try to add a role name that already exists, an error toast ‘Role name {role name} already exists. Please choose a different name’ will appear.
All Roles
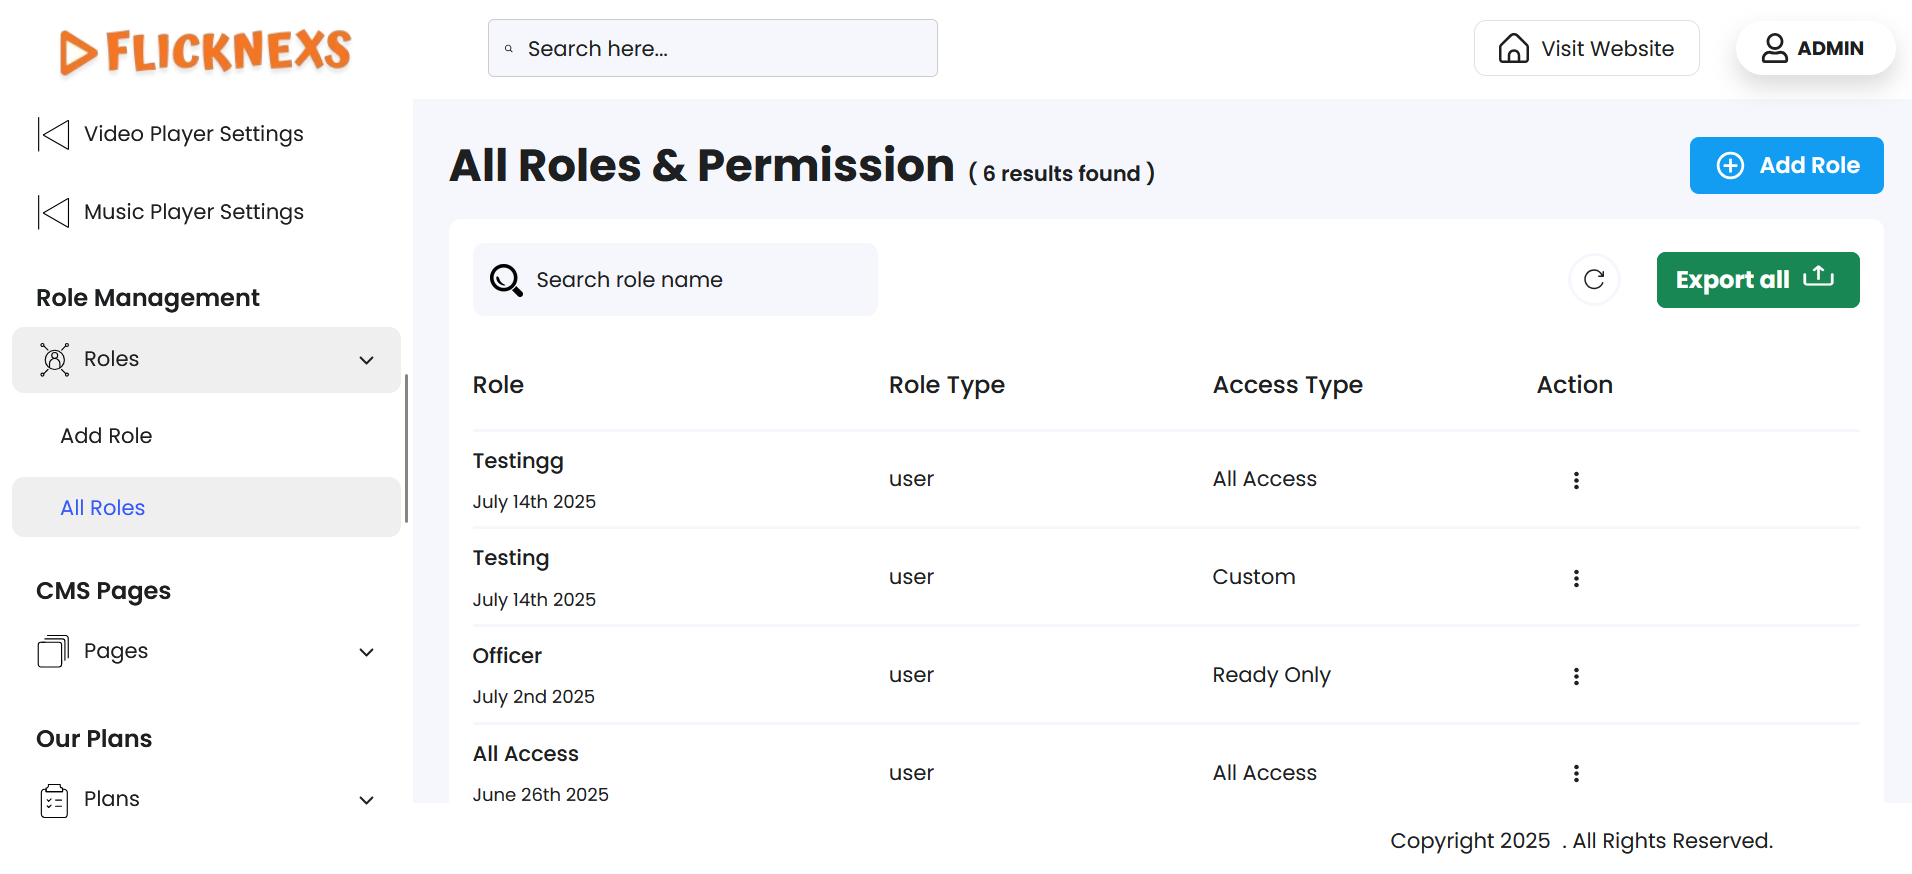
Clicking on ‘All Roles’ will open a list view labeled ‘All Roles & Permissions’ to allow you to view and manage all the roles configured for users and partners on the platform.
You will find a table with the following fields to display the details of all user roles created. They are mentioned below:
- ROLE: Displays the role name along with its creation date.
- ROLE TYPE: Shows the type of role assigned.
- ACCESS TYPE: Displays the level of access granted to the role.
- ACTION: ‘Edit’ and ‘Delete’ are the options available under this field.
- Under ‘Edit’, you will find the same fields available in ‘Add Role’. While ‘Add Role’ is used to create new roles, the ‘Edit’ section allows you to update existing roles.
- Under ‘Delete’, you can either confirm deletion or choose to retain the role.
- A pop-up named ‘Confirm Deletion’ will appear.
- It will ask, ‘Are you sure you want to delete this item?’
- You can choose to click ‘Cancel’ or ‘Delete’ based on your preference.
- A toast notification ‘Permission(s) Deleted Successfully’ will appear to confirm the deletion.
- To simplify your workflow, there is a ‘Search’ button at the top left corner of the table. You can enter specific keywords to filter the roles list, and the matching records will appear accordingly.
- In case the page is not reflecting the updated data, you can use the ‘Reload’ button to refresh and display the latest information. You can find it by navigating to the top-right corner.
- For record-keeping, reporting, backups, or sharing data outside the system, you can export all roles data directly by clicking on ‘Export All’ by navigating to the top right corner of the table. You will find the following format options:
- CSV
- XLSX
Download in your preferred format.
Pagination Controls
Navigate to the bottom section of the page to find these controls:
- Rows Per Page Dropdown
- Use the dropdown menu (showing options – 5, 10, All) to set the number of role records displayed per page.
- Selecting ‘All’ will display all available rows on a single page.
- Showing Rows Information
- It indicates the range of records currently being viewed out of the total number of results.
- Pagination Buttons
- Use the ‘Prev’ and ‘Next’ buttons to navigate backward or forward through pages of results, if there are multiple pages.
NOTE: Clicking on the ‘Add Role’ accordion navigation will open two form sections labeled ‘Create Role’ and ‘Permission Settings’ under the ‘Add Roles & Permissions’ title. Use this accordion navigation to directly add user roles without accessing the ‘All Roles’ accordion navigation.
Benefits of Role Management
- Enhanced Security: Limits access to sensitive features based on user roles, reducing the risk of unauthorized changes or data breaches.
- Improved Efficiency: Streamlines workflows by assigning specific tasks and permissions to different team members.
- Scalability: Easily accommodates growth by adding new roles or adjusting permissions without disrupting existing operations.
- Accountability: Tracks user actions based on roles, making it easier to audit changes and monitor performance.
- Customization: Tailor roles to fit your platform’s unique structure and team responsibilities.